Installing and Configuring Caddy on a Raspberry Pi
DoH with Token Authentication via Caddy + AdGuard Home
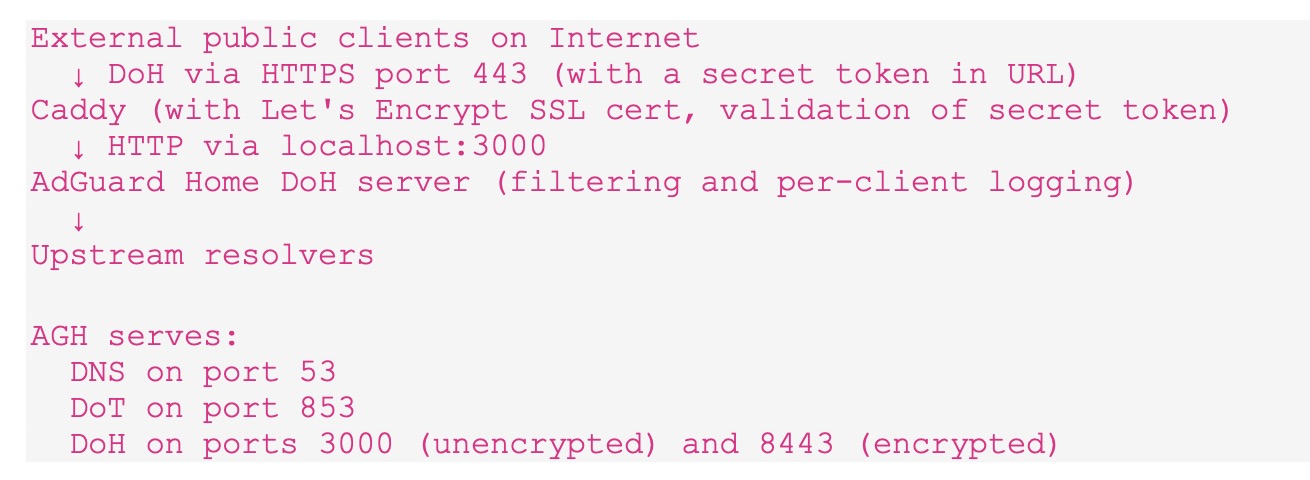
Architecture
This guide sets up Caddy as a reverse proxy in front of AdGuard Home, providing DNS over HTTPS (DoH) with token-based authentication and automatic Let’s Encrypt certificate management.
Environment
- →An Internet connected LAN and devices with IPv6 connectivity
- →Raspberry Pi running Raspberry Pi OS (Bookworm or Bullseye)
- →AdGuard Home already installed and running
- →A domain pointing to your Pi’s IPv6 address (AAAA record)
- →Cloudflare managing your DNS with an API token that has Zone/DNS Edit permissions
Step 1
Install Go Programming Environment
The standard Caddy apt package does not include the Cloudflare DNS plugin required to generate and update SSL certificates via DNS-01 challenge using the Cloudflare API. A custom build is required using xcaddy, which needs the Go programming environment 1.21 or later.
bash
# Remove old apt version if present
sudo apt remove -y golang-go
sudo apt autoremove -y
sudo rm -rf /usr/local/go

# Download Go 1.26.1 for arm64 (Pi 4/5)
# Check https://go.dev/dl/ for the current latest version
wget https://go.dev/dl/go1.26.1.linux-arm64.tar.gz

# Extract to /usr/local
sudo tar -C /usr/local -xzf go1.26.1.linux-arm64.tar.gz

# Add to PATH
echo 'export PATH=$PATH:/usr/local/go/bin' >> ~/.bashrc
echo 'export PATH=$PATH:$(go env GOPATH)/bin' >> ~/.bashrc
source ~/.bashrc

# Verify
go version
⚠ Use linux-armv6l instead of linux-arm64 for Pi 3 or earlier.
Step 2
Build Caddy using xcaddy with Cloudflare Plugin
bash
# Install xcaddy
go install github.com/caddyserver/xcaddy/cmd/xcaddy@latest

# Build Caddy with Cloudflare DNS module
xcaddy build --with github.com/caddy-dns/cloudflare

# Move binary to system path
sudo mv caddy /usr/bin/caddy

# Verify
caddy version
Clean up build files
Go and xcaddy are only needed to build Caddy — once the binary is in place they can be removed:
bash
rm ~/go1.26.1.linux-arm64.tar.gz
sudo rm -rf /usr/local/go
rm -rf ~/go ~/.cache/go-build
Step 3
Create Caddy System User and Directories
bash
# Create caddy system user
sudo groupadd --system caddy
sudo useradd --system \
    --gid caddy \
    --create-home \
    --home-dir /var/lib/caddy \
    --shell /usr/sbin/nologin \
    --comment "Caddy web server" \
    caddy

# Create config and log directories
sudo mkdir -p /etc/caddy
sudo mkdir -p /var/log/caddy
sudo chown caddy:caddy /var/log/caddy
Step 3 cont’d
Reconfigure AdGuard Home
AdGuard Home must move off HTTPS port 443 so Caddy can own it. Change only the HTTPS port — DoT on 853 is completely unaffected.
In the AGH Web UI
Go to Settings → Encryption Settings and change the HTTPS port from 443 to 8443. Save and let AGH restart. Note: to get to the Web UI again after AGH restarts, append :8443 to the URL.
Verify
bash
sudo ss -tlnp | grep -E '443|853'

# Expected output:
LISTEN  AdGuardHome  *:853    # DoT unchanged
LISTEN  AdGuardHome  *:8443   # HTTPS moved
Configure AGH yaml for reverse proxy
Stop AGH before editing the yaml — AGH overwrites changes made while running:
bash
sudo systemctl stop AdGuardHome
sudo nano /opt/AdGuardHome/AdGuardHome.yaml
Ensure these settings are present (add if missing, do not duplicate):
AdGuardHome.yaml
tls:
  enabled: true
  server_name: yourserver-hostname
  force_https: false
  port_https: 8443
  port_dns_over_tls: 853
  allow_unencrypted_doh: true

http:
  address: 0.0.0.0:3000

dns:
  trusted_proxies:
    - 127.0.0.1
    - ::1
bash
sudo systemctl start AdGuardHome
sudo systemctl status AdGuardHome
⚠ allow_unencrypted_doh: true is safe here because port 3000 is bound to localhost only — Caddy is the only process that can reach it.
Step 4
Create the Caddyfile
Generate a secret token. Use all or a subset of the output as your secret token:
bash
openssl rand -hex 32
Create/Edit the Caddy configuration file:
bash
sudo nano /etc/caddy/Caddyfile
Paste the following, replacing your-secret-token with the string generated above:
Caddyfile
{
	auto_https disable_redirects
}

yourserver-hostname {
	tls {
		dns cloudflare {env.CLOUDFLARE_API_TOKEN}
	}

	log {
		output discard
	}

	handle /dns-query/your-secret-token* {
		rewrite * /dns-query?{http.request.uri.query}
		reverse_proxy http://127.0.0.1:3000 {
			header_up Host yourserver-hostname
			header_up X-Real-IP {http.request.header.Cf-Connecting-Ip}
			header_up X-Forwarded-Proto https
		}
	}

	respond 404
}
⚠ auto_https disable_redirects prevents Caddy from trying to bind to port 80, which AGH already owns.
ℹ To change the token later, update both occurrences in the handle block and reload Caddy. Also update ServerURL in your iOS/macOS profile.
Step 5
Create the systemd Service
bash
sudo nano /etc/systemd/system/caddy.service
Paste:
caddy.service
[Unit]
Description=Caddy
Documentation=https://caddyserver.com/docs/
After=network.target network-online.target
Requires=network-online.target

[Service]
Type=notify
User=caddy
Group=caddy
ExecStart=/usr/bin/caddy run --environ --config /etc/caddy/Caddyfile
ExecReload=/usr/bin/caddy reload --config /etc/caddy/Caddyfile --force
TimeoutStopSec=5s
LimitNOFILE=1048576
PrivateTmp=true
ProtectSystem=full
AmbientCapabilities=CAP_NET_BIND_SERVICE
EnvironmentFile=/etc/caddy/caddy.env

[Install]
WantedBy=multi-user.target
Step 6
Set the Cloudflare API Token
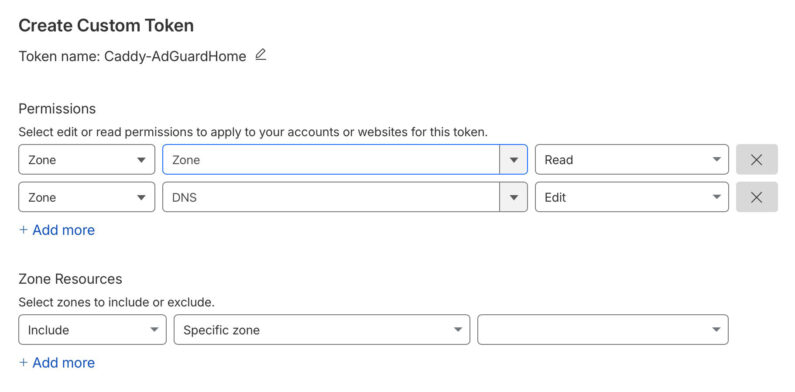
Create a scoped API token in Cloudflare: My Profile → API Tokens → Create Token with Zone/Zone/Read and Zone/DNS/Edit permissions scoped to your zone.
Now insert that token into the Caddy environment file:
bash
sudo nano /etc/caddy/caddy.env
Paste:
caddy.env
CLOUDFLARE_API_TOKEN=your-cloudflare-api-token-here
Secure the file:
bash
sudo chmod 600 /etc/caddy/caddy.env
Step 7
Start and Enable Caddy
bash
sudo systemctl daemon-reload
sudo systemctl enable caddy
sudo systemctl start caddy

# Check it started cleanly
sudo systemctl status caddy

# Confirm Caddy owns port 443
sudo ss -tlnp | grep 443
Step 8
Verify Certificate Acquisition
Caddy will immediately request a Let’s Encrypt certificate via DNS-01 challenge using the Cloudflare API. The request and result is visible in the log:
bash
sudo journalctl -u caddy -f
Look for certificate obtained successfully. This usually takes 30–60 seconds. The DNS-01 challenge creates and deletes a TXT record in Cloudflare automatically — it may happen too fast to see in the Cloudflare dashboard.
Step 9
Open Port 443 on UniFi
If not already done, create a firewall rule on your router allowing inbound TCP port 443 to your Caddy+AGH server’s IPv6 address. If you want to restrict to specific source prefixes you can scope the rule accordingly.
ℹ This endpoint is IPv6 only. IPv4-only clients can also reach it by enabling the Cloudflare DNS proxy service, or by adding IPv4 port forwarding and an A record.
Step 10
Test the Endpoint
Install the dnslookup utility from Github for proper DoH testing (uses POST with binary wireformat, which is what Apple devices use):
bash
wget https://github.com/ameshkov/dnslookup/releases/download/v1.11.2/dnslookup-linux-arm64-v1.11.2.tar.gz
tar -xzf dnslookup-linux-arm64-v1.11.2.tar.gz
sudo mv dnslookup /usr/local/bin/
rm dnslookup-linux-arm64-v1.11.2.tar.gz
Test the setup end-to-end:
bash
# Should return a valid DNS response
dnslookup google.com https://yourserver-hostname/dns-query/your-secret-token

# Should fail - no token
dnslookup google.com https://yourserver-hostname/dns-query

# Test DoT directly to AGH (unaffected by all changes)
dnslookup google.com tls://yourserver-hostname

# Test GET method (optional)
GET=1 dnslookup google.com https://yourserver-hostname/dns-query/your-secret-token
⚠ Do not use curl with ?dns= base64 GET requests for testing — AGH does not support this format. dnslookup uses POST with binary wireformat which is what AGH and Apple devices use.
Optional
iOS and macOS DNS Profile
To use the DoH server on Apple devices, a mobile configuration profile is needed. Save the following as dns-settings.mobileconfig and install by airdropping to an iOS device, opening in Safari on iOS, or double-clicking on macOS. Replace addresses with current values from dig yourserver-hostname A and dig yourserver-hostname AAAA. Generate a fresh UUID with uuidgen.
dns-settings.mobileconfig
<?xml version="1.0" encoding="UTF-8"?>
<!DOCTYPE plist PUBLIC "-//Apple//DTD PLIST 1.0//EN"
  "http://www.apple.com/DTDs/PropertyList-1.0.dtd">
<plist version="1.0">
<dict>
    <key>PayloadContent</key>
    <array>
        <dict>
            <key>PayloadDisplayName</key>
            <string>DNS (yourserver-hostname)</string>
            <key>PayloadIdentifier</key>
            <string>com.apple.dnsSettings.managed.C54E78C7-25BD-4774-8FBD-CEA1F06F60CA</string>
            <key>PayloadType</key>
            <string>com.apple.dnsSettings.managed</string>
            <key>PayloadUUID</key>
            <string>C54E78C7-25BD-4774-8FBD-CEA1F06F60CA</string>
            <key>PayloadVersion</key>
            <integer>1</integer>
            <key>DNSSettings</key>
            <dict>
                <key>DNSProtocol</key>
                <string>HTTPS</string>
                <key>ServerURL</key>
                <string>https://yourserver-hostname/dns-query/your-secret-token</string>
                <key>ServerAddresses</key>
                <array>
                    <!-- Cloudflare proxy A records (if proxy enabled) -->
                    <!-- or your real IPv6 address (if proxy disabled) -->
                    <string>your-ipv4-or-cloudflare-ip</string>
                    <string>your-ipv6-address</string>
                </array>
            </dict>
            <key>OnDemandRules</key>
            <array>
                <dict>
                    <key>Action</key>
                    <string>Connect</string>
                </dict>
            </array>
        </dict>
    </array>
    <key>PayloadDisplayName</key>
    <string>DNS Settings</string>
    <key>PayloadIdentifier</key>
    <string>com.example.dns.profile</string>
    <key>PayloadType</key>
    <string>Configuration</string>
    <key>PayloadUUID</key>
    <string><!-- run: uuidgen --></string>
    <key>PayloadVersion</key>
    <integer>1</integer>
</dict>
</plist>
Ongoing Maintenance
Caddy certificate renewal
Caddy renews Let’s Encrypt certificates automatically. No cron jobs or manual steps needed. Certificates are stored in /var/lib/caddy/.local/share/caddy/.
Reload config after changes
bash
sudo caddy fmt --overwrite /etc/caddy/Caddyfile
sudo systemctl reload caddy
Update Caddy binary
Go only needs to be reinstalled when updating Caddy:
bash
# Reinstall Go (see Step 1), then:
xcaddy build --with github.com/caddy-dns/cloudflare
sudo systemctl stop caddy
sudo mv caddy /usr/bin/caddy
sudo systemctl start caddy
# Remove Go again to free space
sudo rm -rf /usr/local/go ~/.cache/go-build
Change the secret token
Update both occurrences in the Caddyfile handle block, reload Caddy, and update ServerURL in your iOS/macOS profile:
bash
sudo nano /etc/caddy/Caddyfile
# Change: handle /dns-query/OLD-TOKEN*
# Change: rewrite * /dns-query?... (the strip line)
sudo caddy fmt --overwrite /etc/caddy/Caddyfile
sudo systemctl reload caddy
# Also update ServerURL in iOS/macOS profile and reinstall it
