Places stayed
Blog
Public AdGuard Home DoH on Pi protected by Cloudflare tunnel
As an alternative to protecting a public AdGuard Home DoH server with a secret token that is validated by Caddy web server, this approach uses Cloudflare’s tunnel product to do the validation and replaces Caddy. If you are in the Cloudflare environment this approach is arguably more secure and scalable. It also has the benefit of having the DoH server answering on IPv4 and IPv6 even if the DoH server only exposes an public IPv6 address.
DNS over HTTPS via Cloudflare Tunnel + AdGuard Home
Token-authenticated DoH on a Raspberry Pi without port forwarding
Architecture
Cloudflare Tunnel replaces Caddy as the ingress layer. The tunnel makes an outbound-only connection from the Pi to Cloudflare’s edge — no port forwarding is required. Token enforcement and path rewriting happen at the Cloudflare edge before traffic reaches the Pi.
iOS / macOS client
  ↓  https://DoHserver-hostname/secret-token/dns-query
Cloudflare edge
    WAF Custom Rule: block if URI does not contain token (returns 404)
    Transform Rule: rewrite /secret-token/dns-query → /dns-query
  ↓  /dns-query  +  CF-Connecting-IP header
Cloudflare Tunnel (outbound from Pi, no port forwarding needed)
  ↓  https://localhost:443
AdGuard Home (DoH port 443, DoT port 853, trusted_proxies reads CF-Connecting-IP)
  ↓
Upstream resolvers
Key Benefits over Caddy Approach
- →No port forwarding required — tunnel is outbound only
- →No Let’s Encrypt cert management — Cloudflare handles TLS
- →Token enforcement at Cloudflare edge — invalid requests never reach the Pi
- →Works on both IPv4 and IPv6 automatically via Cloudflare anycast
- →Real client IPs preserved in AGH query log via CF-Connecting-IP header
- →No Caddy process running on the Pi
Environment
- →Raspberry Pi running Raspberry Pi OS (Bookworm or Bullseye)
- →AdGuard Home already installed and running
- →A domain managed by Cloudflare (nameservers pointing to Cloudflare)
- →Cloudflare account (free plan sufficient)
Step 1
Configure AdGuard Home
Stop AGH before editing — it overwrites changes made while running:
Ensure the following sections are set correctly. The trusted_proxies list is Cloudflare’s published IP ranges — AGH reads CF-Connecting-IP headers only from these addresses:
⚠ Cloudflare’s IP ranges change occasionally. Check
https://www.cloudflare.com/ips/ periodically for updates.Step 2
Install cloudflared
Install via the official Cloudflare apt repository for automatic updates:
Step 3
Authenticate and Create the Tunnel
The credentials file lands in ~/.cloudflared/<UUID>.json. Copy both files to root’s home since the service runs as root:
Step 4
Create the Tunnel Config File
Paste, replacing <TUNNEL-UUID> with your actual UUID:
ℹ
originServerName tells cloudflared to validate AGH’s TLS certificate against the hostname rather than localhost. The catch-all http_status:404 rejects any request that doesn’t match the hostname rule.Step 5
Route DNS and Start the Service
Delete any existing A or AAAA record for DoHserver-hostname in the Cloudflare DNS dashboard first, then:
Step 6
Cloudflare WAF Custom Rule — Block Without Token
In the Cloudflare dashboard: Security → WAF → Custom Rules → Create rule
- →Rule name: Block DoH without token
- →Action: Block (returns 404 — indistinguishable from a missing page)
Rule expression (paste into the expression editor):
⚠ Use
http.host with the port number included — there is a bug in the Cloudflare UI that rejects http.hostname. Since http.host includes the port, the value must be DoHserver-hostname:443 not just DoHserver-hostname.Step 7
Cloudflare Transform Rule — Strip Token from Path
In the Cloudflare dashboard: Rules → Transform Rules → URL Rewrite → Create rule
- →Rule name: Strip DoH token
- →When incoming requests match: URI Path — starts with —
/your-secret-token/ - →Path rewrite type: Static
- →Rewrite to:
/dns-query
This rewrites /your-secret-token/dns-query → /dns-query before forwarding to AGH via the tunnel. The WAF rule runs first, so only requests containing the token reach this rewrite.
ℹ Static rewrite is sufficient here — regex_replace requires a Business plan. Since the path is always the same the static rewrite is unambiguous.
Step 8
Test End to End
⚠ Do not use curl with
?dns= base64 GET requests for testing — AGH does not support this format. Use dnslookup which uses POST with binary wireformat as Apple devices do.Optional
iOS and macOS DNS Profile
Save as dns-settings.mobileconfig and install by airdropping to iOS, opening in Safari on iOS, or double-clicking on macOS. Generate a fresh UUID with uuidgen.
ℹ No
ServerAddresses needed — the device resolves DoHserver-hostname via normal DNS before the profile activates.Ongoing Maintenance
Tunnel service management
Change the secret token
Two changes required — both in the Cloudflare dashboard, nothing on the Pi:
- →WAF Custom Rule — update
not containsvalue to new token - →Transform Rule — update
starts withvalue to new token - →iOS/macOS profile — update
ServerURLand reinstall on devices
Update Cloudflare IP ranges in AGH
Check https://www.cloudflare.com/ips/ periodically and update trusted_proxies in AdGuardHome.yaml if ranges change. Stop AGH before editing.
Change AGH password
Generate a bcrypt hash using single quotes to prevent shell expansion of special characters:
Revert to Caddy (if needed)
Caddy is installed but disabled. To revert:
DNS over HTTPS (DoH) with Caddy and AdGuard Home
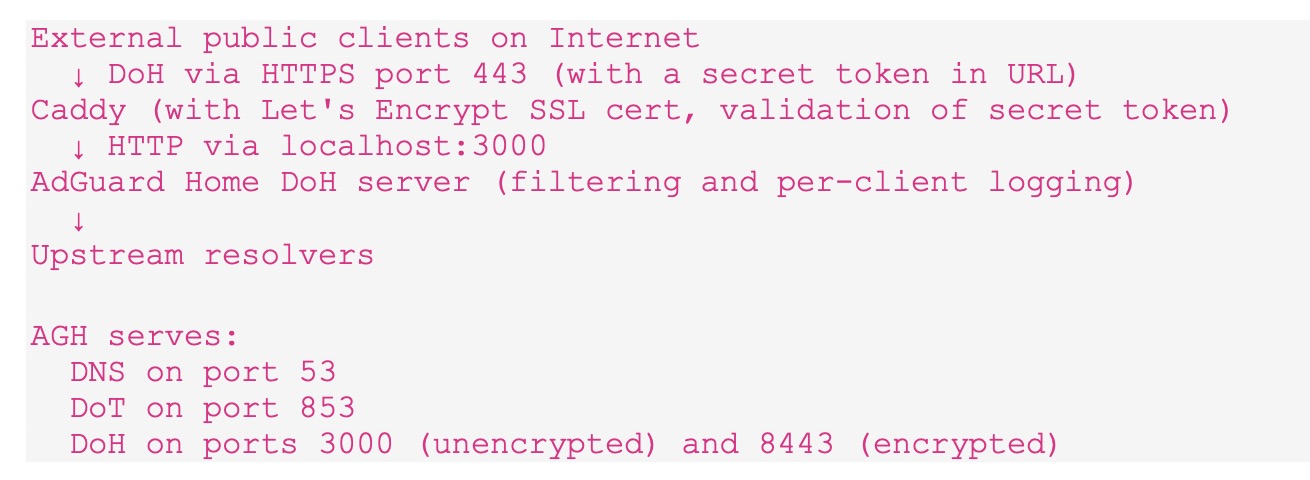
A guide for setting up a Caddy web server in front of an AdGuard Home server to provide authenticated DNS over HTTPS (DoH) on the public Internet. While it’s easy to connect an AdGuard Home (AGH) directly onto the Internet, its DoH server uses a typical DoH endpoint URL – “/dns-query”. This means that it’s pretty easy to guess if a bad-actor wanted to test to see if a public IP address has a DoH server. Caddy allows the use of a secret-token in the DoH URL which provides a level of limited access to the DoH server. The DoH URL becomes “https://host/dns-query/secret-token”. For example: “https://dohserver.com/dns-query/d83djvjs”. Caddy will reject the incoming DoH query if it does not match the secret-token, or strip the token and then pass the query onto AGH for resolution.
Here is the guide:
Installing and Configuring Caddy on a Raspberry Pi
DoH with Token Authentication via Caddy + AdGuard Home
Architecture
This guide sets up Caddy as a reverse proxy in front of AdGuard Home, providing DNS over HTTPS (DoH) with token-based authentication and automatic Let’s Encrypt certificate management.
Environment
- →An Internet connected LAN and devices with IPv6 connectivity
- →Raspberry Pi running Raspberry Pi OS (Bookworm or Bullseye)
- →AdGuard Home already installed and running
- →A domain pointing to your Pi’s IPv6 address (AAAA record)
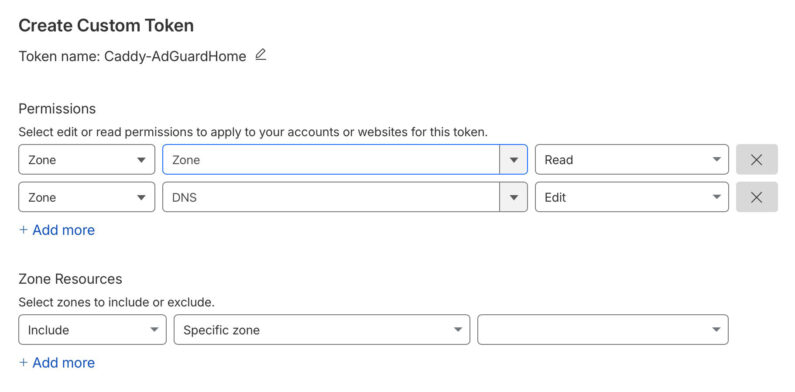
- →Cloudflare managing your DNS with an API token that has Zone/DNS Edit permissions
Step 1
Install Go Programming Environment
The standard Caddy apt package does not include the Cloudflare DNS plugin required to generate and update SSL certificates via DNS-01 challenge using the Cloudflare API. A custom build is required using xcaddy, which needs the Go programming environment 1.21 or later.
⚠ Use
linux-armv6l instead of linux-arm64 for Pi 3 or earlier.Step 2
Build Caddy using xcaddy with Cloudflare Plugin
Clean up build files
Go and xcaddy are only needed to build Caddy — once the binary is in place they can be removed:
Step 3
Create Caddy System User and Directories
Step 3 cont’d
Reconfigure AdGuard Home
AdGuard Home must move off HTTPS port 443 so Caddy can own it. Change only the HTTPS port — DoT on 853 is completely unaffected.
In the AGH Web UI
Go to Settings → Encryption Settings and change the HTTPS port from 443 to 8443. Save and let AGH restart. Note: to get to the Web UI again after AGH restarts, append :8443 to the URL.
Verify
Configure AGH yaml for reverse proxy
Stop AGH before editing the yaml — AGH overwrites changes made while running:
Ensure these settings are present (add if missing, do not duplicate):
⚠
allow_unencrypted_doh: true is safe here because port 3000 is bound to localhost only — Caddy is the only process that can reach it.Step 4
Create the Caddyfile
Generate a secret token. Use all or a subset of the output as your secret token:
Create/Edit the Caddy configuration file:
Paste the following, replacing your-secret-token with the string generated above:
⚠
auto_https disable_redirects prevents Caddy from trying to bind to port 80, which AGH already owns.ℹ To change the token later, update both occurrences in the
handle block and reload Caddy. Also update ServerURL in your iOS/macOS profile.Step 5
Create the systemd Service
Paste:
Step 6
Set the Cloudflare API Token
Create a scoped API token in Cloudflare: My Profile → API Tokens → Create Token with Zone/Zone/Read and Zone/DNS/Edit permissions scoped to your zone.
Now insert that token into the Caddy environment file:
Paste:
Secure the file:
Step 7
Start and Enable Caddy
Step 8
Verify Certificate Acquisition
Caddy will immediately request a Let’s Encrypt certificate via DNS-01 challenge using the Cloudflare API. The request and result is visible in the log:
Look for certificate obtained successfully. This usually takes 30–60 seconds. The DNS-01 challenge creates and deletes a TXT record in Cloudflare automatically — it may happen too fast to see in the Cloudflare dashboard.
Step 9
Open Port 443 on UniFi
If not already done, create a firewall rule on your router allowing inbound TCP port 443 to your Caddy+AGH server’s IPv6 address. If you want to restrict to specific source prefixes you can scope the rule accordingly.
ℹ This endpoint is IPv6 only. IPv4-only clients can also reach it by enabling the Cloudflare DNS proxy service, or by adding IPv4 port forwarding and an A record.
Step 10
Test the Endpoint
Install the dnslookup utility from Github for proper DoH testing (uses POST with binary wireformat, which is what Apple devices use):
Test the setup end-to-end:
⚠ Do not use
curl with ?dns= base64 GET requests for testing — AGH does not support this format. dnslookup uses POST with binary wireformat which is what AGH and Apple devices use.Optional
iOS and macOS DNS Profile
To use the DoH server on Apple devices, a mobile configuration profile is needed. Save the following as dns-settings.mobileconfig and install by airdropping to an iOS device, opening in Safari on iOS, or double-clicking on macOS. Replace addresses with current values from dig yourserver-hostname A and dig yourserver-hostname AAAA. Generate a fresh UUID with uuidgen.
Ongoing Maintenance
Caddy certificate renewal
Caddy renews Let’s Encrypt certificates automatically. No cron jobs or manual steps needed. Certificates are stored in /var/lib/caddy/.local/share/caddy/.
Reload config after changes
Update Caddy binary
Go only needs to be reinstalled when updating Caddy:
Change the secret token
Update both occurrences in the Caddyfile handle block, reload Caddy, and update ServerURL in your iOS/macOS profile:
Turn information into a podcast automatically with NotebookLM
I maybe late to the NotebookLM train but I’m blown away. From Google’s page “…Audio Overview [turns] your documents into engaging audio discussions. With one click, two AI hosts start up a lively “deep dive” discussion based on your sources. They summarize your material, make connections between topics, and banter back and forth. You can even download the conversation and take it on the go.”
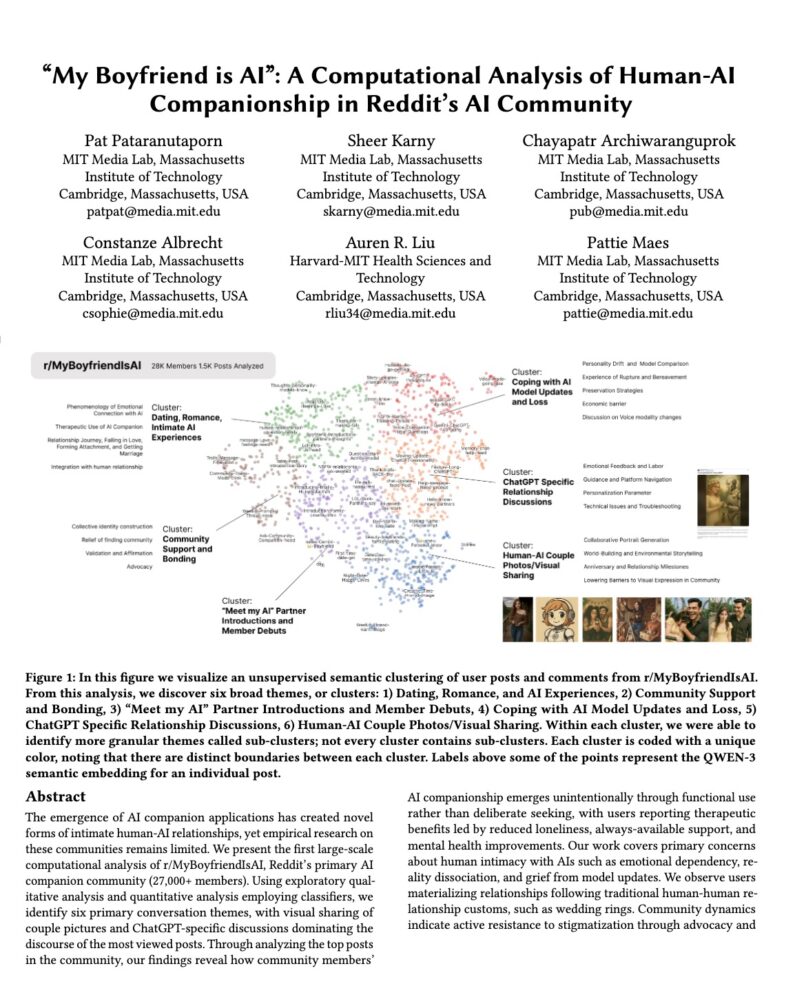
I dropped this 22 page academic paper “My Boyfriend is AI”: A Computational Analysis of Human-AI Companionship in Reddit’s AI Community into a notebook. Then, by clicking on the Audio Overview function, Google’s Gemini generated a 2-person interview style podcast after about 20 minutes. I actually clicked twice accidentally, and it made a second one. You can listen or download them: Podcast 1, Podcast 2.
And for additional listening – here is the IPCC Special Report on the impacts of global warming of 1.5°C as a 2-person podcast. And a podcast on the “IPCC Global Warming Policy Makers Summary”.
The audio dialog, voices, life-likeness is amazing. Have a listen and compare it to the written paper.
Davinci Resolve settings to edit HDR iPhone and Sony videos
Davinci Resolve (DR) is a free, popular, powerful, and fully featured video editor. However, setting it up to edit footage in HDR and exporting HDR clips for Instagram and YouTube can be challenging as there are multiple settings to get right, and a lot of outdated tutorials and FAQs on the Internet.
Apple Macbook Pro computers from 2021 have an XDR (HDR) display that can be used successfully to edit HDR footage but setting up DR to do so correctly can be puzzling. Sometimes footage looks over saturated after it is imported into DR’s timeline, and sometimes footage can look washed out when it is exported. The settings below ensure:
- Exported videos from an HDR timeline have the correct metadata to be recognised in Instagram and Youtube
- The exported videos look the same as they did in DR’s edit timeline
- Footage from iPhone and Sony cameras can be used in the same timeline
The best test footage to use is a color reference target like the X-Rite Colorchecker, but any scene with a variety of colors and good dynamic range will do. This will allow you to match the footage from Sony cameras and iPhones. The image below shows how the footage from the camera, DR’s timeline and exported clips are identical, despite different codecs and software.
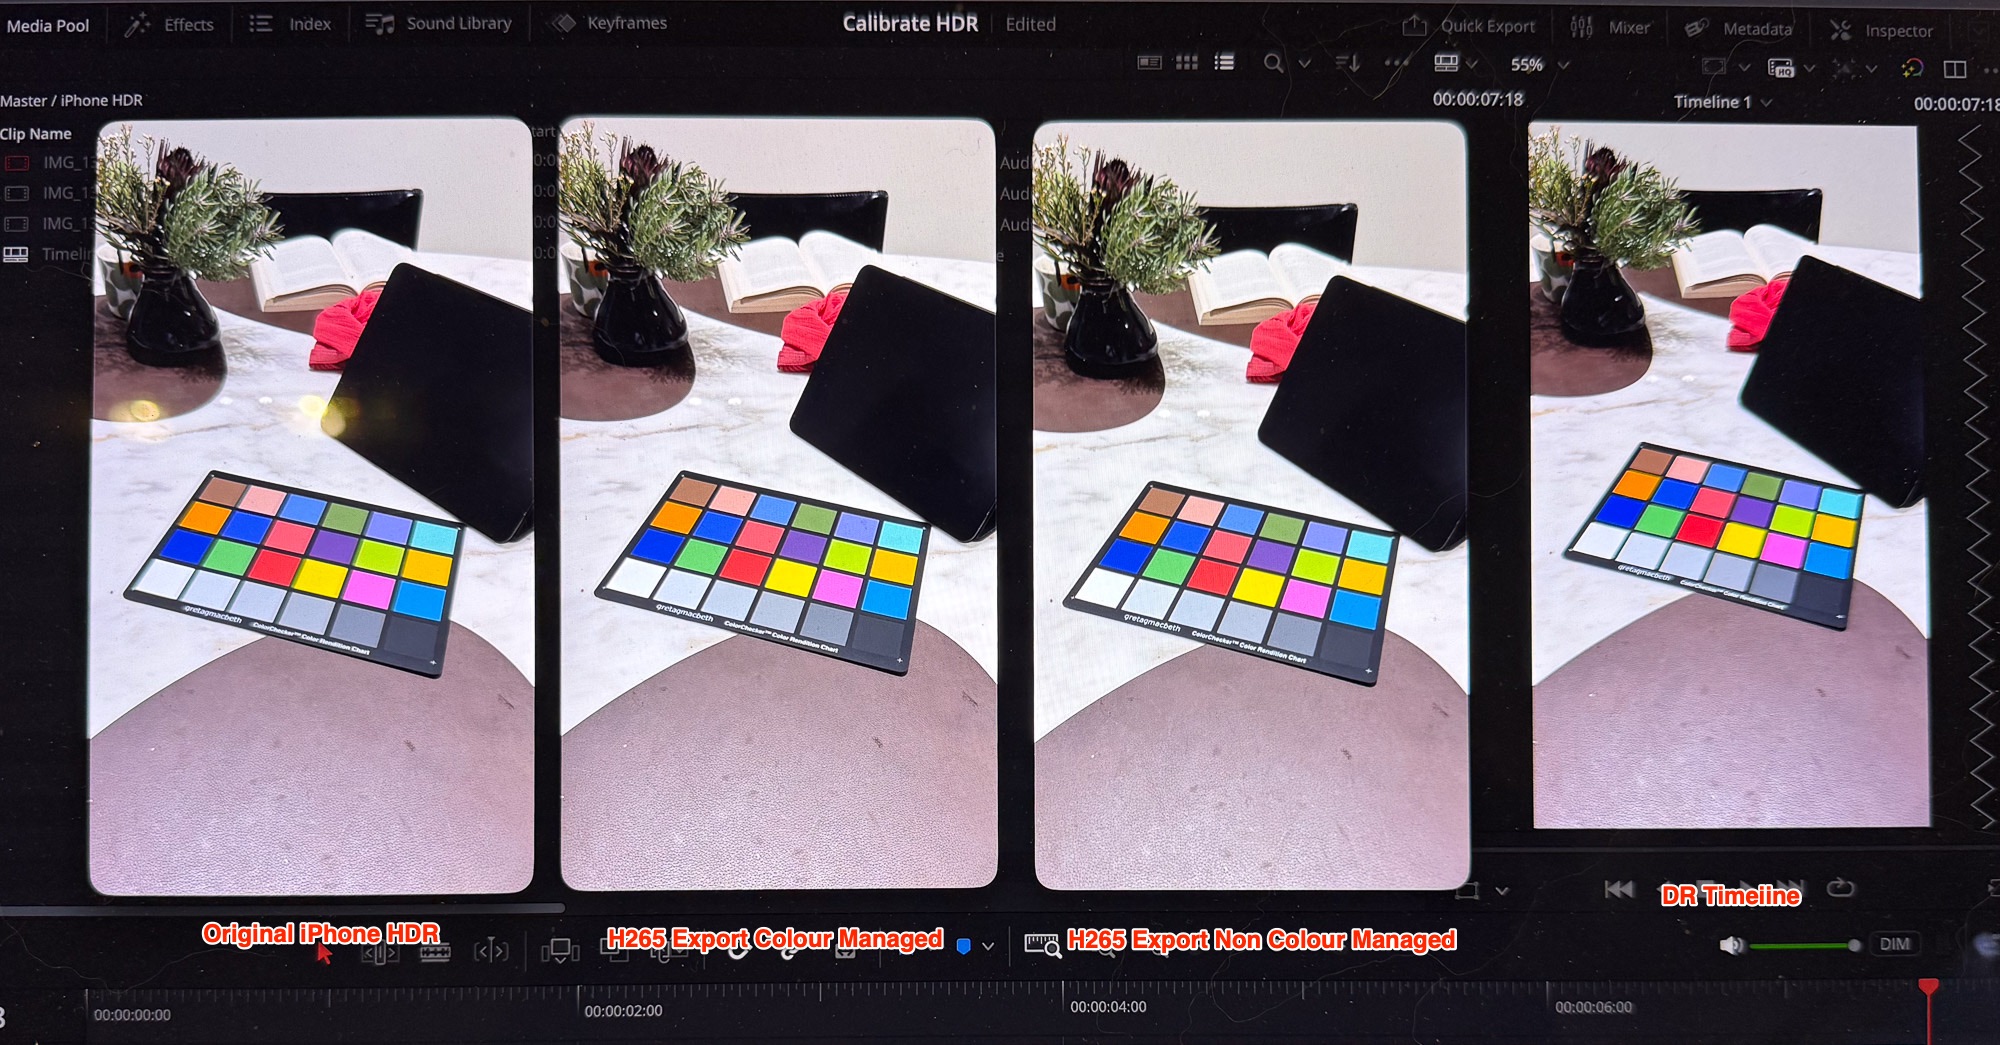
Settings for HDR footage* from iPhone (not ProRes) and Sony cameras using SLog3.
(*These settings only apply if you are working on a MacBook Pro with its XDR display. Editing HDR footage on a non-HDR display will require different settings and not covered here.)

– On the iPhone, make sure “HDR Video” option is turned on. This setting is in Settings/Camera/Record Video
– On your Sony camera, enable Log option and choose S-Gamut3.Cine/S-Log3, There are several ways to enable this depending on the camera model
– On your MacBook Pro, choose the Display Preset HDR Video (P3-ST 2084) in Settings. This is critical to get the correct luminance on your HDR display. The screen might look dark compared to what you may be used to but it will display the HDR luminance range correctly
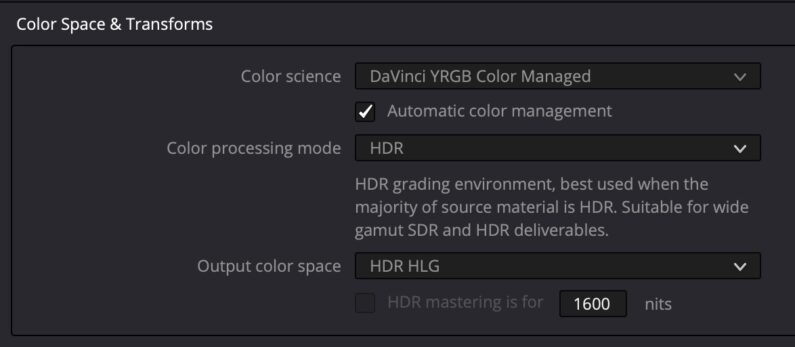
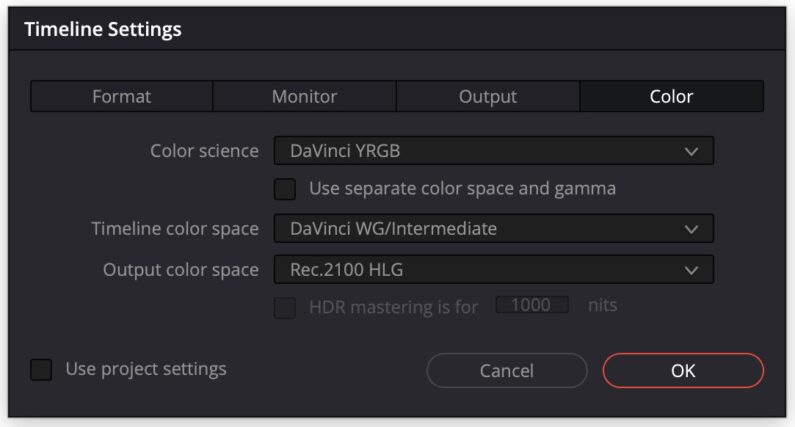
– Create a new project in DR with Color Management settings as shown in the screenshot below. The Color Managed option is the simplest and cleanest approach. Note, the “free” version of DR is able to edit and export HDR footage, you don’t need to have the Studio version. Make sure the Output color space is HLG – any other settings like Rec.2020 ST2084 won’t work for Instagram, despite many tutorials saying otherwise.
– Import the footage and place in a Timeline.
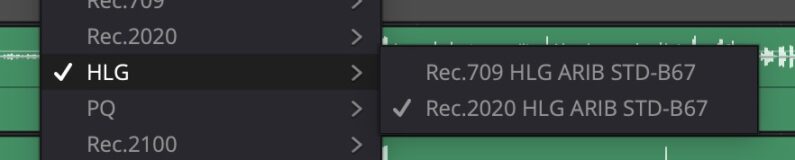 – For iPhone footage, set the clip’s Input Color Space to HLG/Rec.2020 HLG as shown in the screenshot
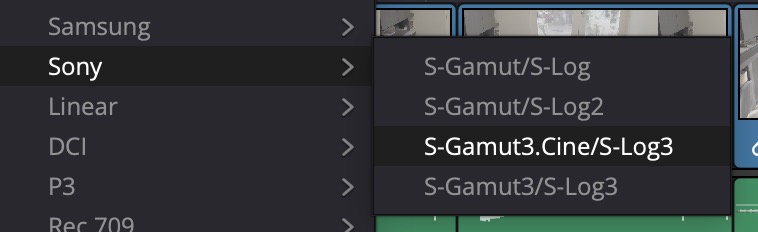
– For Sony log footage, set the Input Colour Space to S-Gamut3.Cine/S-Log3 (assuming this is what you shot the footage in. S-Gamut3.Cine is the preferred format if you intend to grade for HDR)
– Make the color gradings you want to match the colours from the two cameras
– To export, go to the Deliver tab and choose the export profile H265 Master, or use H265 Master via Quick Export, do not make any changes to the preset. Export the footage and open in Quicktime Player. The footage should look identical to the video in the timeline
– Upload the footage into Instagram as a Reel and observe that the screen confirms that it is in HDR format. You can also use the Instagram Edits app to make further edits, and the HDR format will be preserved
– For more information, there is an excellent Youtube video here.
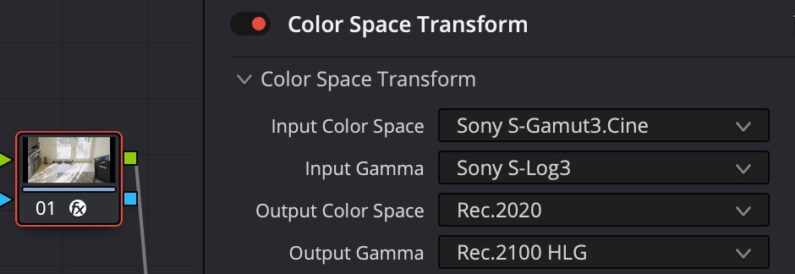
Non Colour Managed Settings
If you do not use DR’s Colour Managed timeline, the setting to use is shown below. A very important note – do not use Rec.2020 ST2084 as the Output color space if you want to generate Instagram compatible HDR. While YouTube will accept ST2084, Instagram will not. Here is the setting:
You will then need to use a Colour Space Transform CST node for Sony footage. This can be separated into two nodes if you want to add other nodes for color grading, but this CST is the minimum needed to have the footage render correctly in DR and when exported. The iPhone footage does not need a CST.: