Blog
I’ve been using Windows Media Center since 2006. I built my first Windows Media Center on an Asus M2NPV-VM motherboard with an Athlon CPU. That lasted until 2014 when I upgraded to a tiny Gigabyte BRIX Pro i5 4570R computer. However, with more HD free to air channels the little BRIX was getting a bit sluggish. With the advent of Skylake, Intel’s 6th generation CPU and motherboards a little update was in order.
The main problem in 2016 is that Windows Media Center is not part of Windows 10 nor 8.1 and 8. And Windows 7 isn’t really an operating system that Microsoft wants to support on the latest Intel CPU and motherboards. This is a post about installing Windows 7 Home Premium on a 2016 motherboard and getting WMC to work.
The steps are:
- Build the PC
- Get a Windows 7 installer onto a USB stick
- Fix the USB installer so it works with USB 3 ports
- Install Windows 7 and motherboard drivers
- Install Windows 7 updates
- Install the TV tuner and infra red remote
- Configure WMC
1. My PC build is using a Gigabyte GA-H170N-WIFI motherboard. I’m pairing an i7 and 16GB of RAM in a Streacom FC5 case. Pretty simple hardware. The case is fanless and so is the Zeroflex power supply. Nothing tricky here, just make sure your RAM is compatible with the motherboard.
2. Making a Windows 7 USB installer is a bit trickier. You need to download the ISO file from Microsoft or make one from an installation DVD. Once you’ve got the ISO file you will need to download the Windows USB/DVD Download Tool. This application requires .NET 2.0 and if you’re running it on a Windows 10 PC, you’ll need to enable the older .NET with this tip. Just run the app and follow the instructions.
3. The next problem to solve is to enhance the USB installer so that it will recognise USB 3 ports on the motherboard. Windows 7 only supported USB 2 ports and the new motherboards have a newer version that the installer won’t recognise. Luckily, the major motherboard manufacturers have posted drivers and procedures to update the installer to work. For Gigabyte motherboards, there is the Windows USB Installation Tool for Windows 7. Just download the utility and follow the instructions on how to update your USB installer.
4. Now armed with your USB installer, just boot up your PC and install Windows 7. Nothing tricky at this step. After Windows 7 is installed, you won’t have much functionality as none of the drivers are there. Download the LAN or WLAN driver for your motherboard so you can download updates.
5. Now that you’ve got Internet access, you’ve got to update Windows 7 with all the patches and drivers since the DVD was made. In April 2016, there are 213 updates at over 1GB. So this will take a bit of time. You may also need to download an update if Windows Update is stalling on checking for updates as described here. If it is, there’s a fix here. Start the update and come back in an hour.
6. Now your PC is up to date and ready for your peripherals. I have a dual USB tuner stick and an infra red receiver for the remote control. Download the drivers for your WMC and install them.
7. The final step is to setup WMC with your sound and TV preferences. Nothing tricky here. This was painless and is the same process as it was in 2006.
You should now have a functioning and very speedy Windows Media Center, running on 2016 hardware. Sit back and enjoy.
Apr 10, 2016 | Categories: Tech, Tutorial | Comments Off on Windows 7 Media Center install on Skylake Gigabyte GA-H170N-WIFI
At what is probably the first international event where Nikon’s NPS and Canon’s CPS had the new flagship cameras available I couldn’t resist to take them both out for a spin.
Readers may remember that I switched from Nikon to Canon about 3 years ago when I was let down by the Canon 1D Mk3’s autofocus issues. Switching to Nikon’s D3, then D3s and then the D4 gave me a good handle on the Nikon offering. I then switched back to Canon with the 1D-X after unhappiness with AF issues with the D4.
Here are two photos from sessions I had with the 1D-XMk2 and D5.
First off is the Canon with a 200-400mm (1.4TC on) lens 1/1600 @ f/7.1 ISO 2000.

This is from the Nikon with the relatively new 200-500mm 1/1000 @ f/5.6 ISO 640.
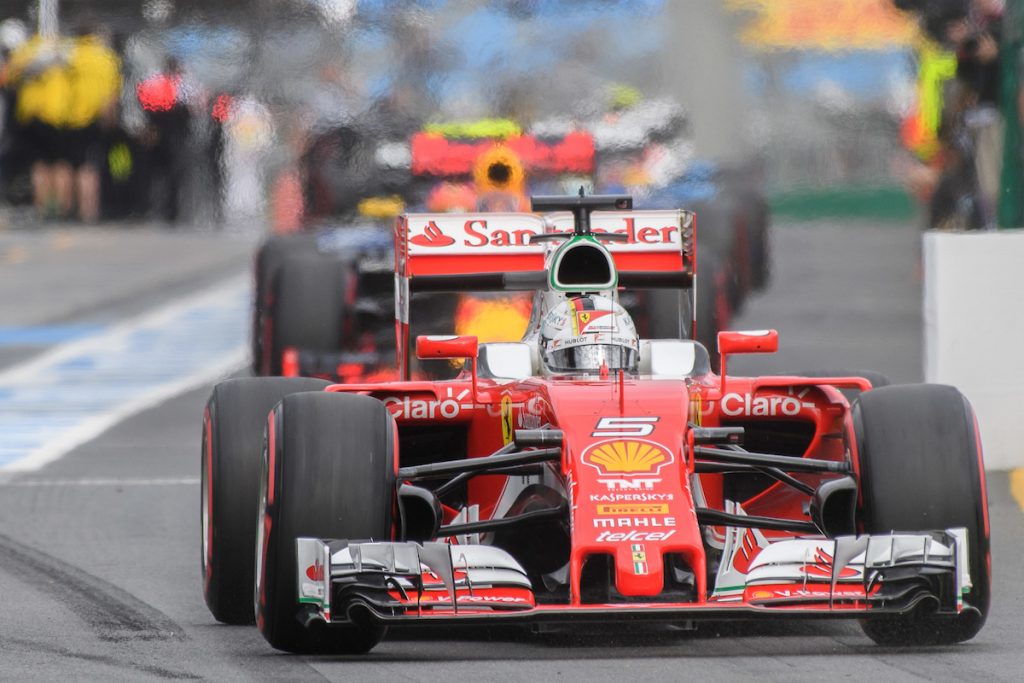
The AF on the Canon was noticeably more accurate than the current 1DX. The new body would have a burst of 6-9 images of cars accelerating through turn 1 into turn 2 in focus with 1-2 slightly off. And the 14 fps shutter felt really “new” and well sorted. The current body would usually yield 3-4 images that were locked on. What was more impressive was that with the 1.4 TC flipped on the 200-400mm lens the AF was just as accurate. This is usually not the case with the current body with hit rates dropping significantly in some lighting conditions. This image is one of 6 that were all in focus and shot instinctively. I was waiting for Massa to come through turn 2 when he ran wide unexpectedly at turn 1 so the camera had to acquire and then lock on. If you rely on the 200-400mm lens then this body is almost a “must have upgrade”.
The Nikon D5 also felt solid. The D5’s frame rate isn’t faster than the current 1DX so it didn’t feel new. However, it felt more responsive. Less lag than the current Canon. Shooting with the 200-500mm handheld hanging out of a fence hole showed how versatile the D5 and 200-500mm combo was. It’s slightly bigger than a 70-200mm but the reach is much longer. There’s no complaint about the AF which is a good thing as cars coming out of the pits towards me isn’t much of a challenge. I did see enormous latitude in the NEF raw files, and a need to pull back the highlights to get detail back into the bright areas of the image. The red nose of the Ferrari and the helmet looked blown out when the file was looked at out of camera but adjusting the highlight slider in Lightroom brought the details back.
So there you are. A quick write-up of these two flagship DSLRs.
Apr 03, 2016 | Categories: Cars, Recent shoots, Reviews, Sport | Comments Off on Shooting the Nikon D5 and Canon 1DX Mk2 at the Australian Formula 1 F1
A few images from the grand final match where Melbourne City def Sydney FC 4-1. Melbourne won every match in its first season in the league and the grand final.
Feb 02, 2016 | Categories: Recent shoots, Soccer | Comments Off on Melbourne City wins 2015-16 W-League in its first season
We’re well into week 2 of the Australian Open. Here are some photo highlights. More images here.
Jan 26, 2016 | Categories: Recent shoots, Tennis | Comments Off on Australian Open 2016
In Apple’s OSX operating system 10.11 El Capitan, the Photos app is set to automatically open when you insert a memory card. While you can change that on a per card basis, when you format the memory card the app will open again.
There’s no setting in the app to stop this, but you can do so using a command line in Terminal to change the name of the helper app. There’s an extra complication with OSX 10.11. Apple has added a new protection layer where certain apps are marked as Protected. Photos.app is one of these apps and to change it, another step is needed to disable the protection layer called SIP. Here is a step by step guide.
Thanks to this reddit post.
Nov 22, 2015 | Categories: Tech, Tutorial | Comments Off on How to stop Photos.app automatically opening when you insert memory card